|
Hear this kite (*.mp3,18sec,37K) |
|
Hear this kite (*.mp3,18sec,37K) |
Hear an exceptional Sound sample
of an original Nantong-Flute-Kite.
With friendly permission of Marcia
Bujold!
http://www.windabove.com
(See her site on Nantong kites!)
Materials:
Tools
The single working operations
a) First cut out with the scissors a veneer stripe of 3.0 cm width and 11 cm length. The long side of the rectangular stripe across to the grain (= darker stripes in the wood) because the stripes can be bowed only in this manner to the relative narrow diameter of 3.0 cm without breaking.
b) Then cut out a circle of fir-veneer, 3.0 cm in diameter. The grain direction isn't important. Be careful. Cut always from parallel to the grain to crosswise to it for otherwise the veneer will split off.
c) Then bevelling of the inner layer of the veneer strip which is glued around the tube in order that no "step" forms on the inner side of the flute body.
d) Wettening of the later outer side of the veneer strip for prebending the strip. This prevents braking of the strip while bending around the tube.
e) Lay the strip around the tube, glue the overlapping part with white wood glue and fix it with rubber rings while drying.
f) Slip off the cylindric sleeve now dry and freed from rubber rings and set it with the opening up onto a flat surface.
g) Push the cut out veneer circle from point b) (make it fitting with sanding paper) through the cylindric sleeve to it's bottom, while pressing the sleeve slightly on the surface. Don't push the circle out of the sleeve. It must fit precise with the edge of the cylinder without tension or convexity to prevent later breaking.
h) Carefully glue (airtight!) the circle with the cylinder edge from the inner side with white wood glue. Put it on the side and let it dry.
a) Make a bamboolath of 4 cm width and 20 to 30 cm length by splitting parallel to the grain. (The more flute heads, the longer the lath)
b) Flat carving or planing of the soft, white (bamboo inner) side of the lath in order that a lath thickness of 7-10 mm will remain. The yellowish bamboo outer side remains unworked!
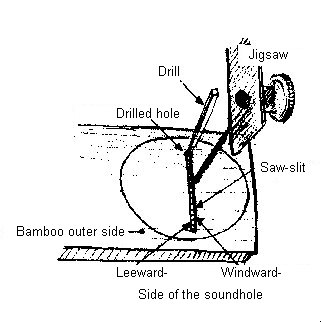
c) (Pict. 1) A circle of 3.0cm diameter is outlined on the hard yellowish (bamboo outer) side. Then another circle which is slightly bigger (3.4 cm)than the flute's diameter is outlined (for the head's conic shape and later corrections). Transmit the smaller (3.0cm) circle on the other (under) bamboo side, in order that both outlined circles are identically one upon another.
d) (Pict. 1) Mark on the hard (outer) bamboo side the leeward, later sharpened edge of the soundhole, at the second third of the flute head diameter (count begins leeward). Mark the windward, later dull and bevelled edge of the soundhole in a distance of 2 mm to the windward side.
e) (Pict. 1) Now saw slits along the two marked lines mentioned above. Distance to the outlined circle approximately 3 mm. Depth of the saw slits 1-2 mm, depending on the convexity of the bamboo lath (determined by the diameter of the bamboo cane).
f) (Pict. 1) Drill a small hole through the lateral part between the sawed slits in order to let pass the jig saw blade.
g) (Pict. 1) Pull through the jig saw blade (saw teeth in direction to the saw hold). Put it in the jig saw bow and saw along the windward edge of the sound hole till a distance of 3 mm to the outlined smaller (3.0) circle. The saw slit is a marking on the soft (inner bamboo) side for excavating the flute head.
h) (Pict. 2) Now bevelling of the flute head beginning from windward side of the sound hole to the head's edge in order that the flute can be blown by the wind with a bigger angle. Don't forget to redraw the carved away outlines of the flute head.
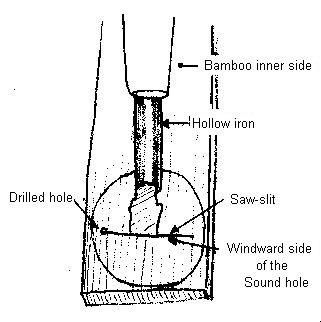
i) (Pict. 3 and Beginning from the soft, white (bamboo inner) side the flutehead is now carved out with the hollow iron from the leeward side to the jig-saw slit. Look out, that the later to be sharpened lee-ward side of the soundhole isn't hurt! It is a absolute must fur the perfect sound! Try to make flowing transitions while carving. The better you do it, the better the sound will be.
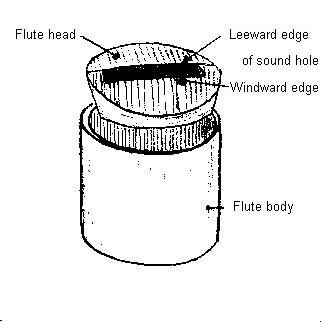
j) (Pict. 5/1 and 5/3) From the windward side of the flute head to the soundhole you can also slightly hollow out. The windward part of the soundhole is dull and has a thickness of approx. 2 mm.
k) Finish the sound hole. If you "aim" over the flutehead in direction of the streaming wind, look out that the "step" of the soundhole is 2 mm over its whole width. In no case the "step" must be lower in the sideparts of the soundhole! Finish the lateral arcs of the soundhole with needle roundfiles and the sharp leeward part with a scalpel from the hollow side out ( be careful, don't carve through!).
m) (Pict. 5/1+5/2 ) Bevel the plane of the dull part of the sound hole. Has to form an angle of (40)-60° with the flutehead's surface, if not, the flute won't sound. It seems, that an sound-hole's width:length ratio of 1:6 up to 1:10 sounds best. The increasing distance of windward/leeward edge of the soundhole determines the (also increasing) loudness of the generated tone, but will then require an higher windspeed for sounding.
n) (Pict. 5/1+5/3, Pict.6 ) The outer edges of the flutehead (bigger circle 3.4cm) are shaped conically and fitted in the flute's body. Then the flute's head is glued into the flute-body after reading carefully the next point.
o) The rough tuning depends on the flute's diameter and length. The fine tuning can only be done in direction of the next higher tone by carefully enlarging the soundhole. You can also play a little bit by putting in the flutehead more or less deep into the body. Tuning deeper isn't possible without diminishing the soundhole's projected area or enlarging the flute's volume.
Please note, that always little holes will remain before the final gluing of the flutehead, what makes the flute's pitch higher than it will be after being glued.
So it is better to try the final tuning with a little bit of glue, correcting the pitch immediately in the above mentioned manner and glue finally if the desired tone is reached.
If you want to make bigger flutes, you can experiment with whole bamboo internodes, coconut shell, make flutes from dry gourds, paper mâché, beer cans etc. There are may ways to produce the wind which makes your whistle sound, for example mount it on your car, bicycle or on a device on a string, which is whirled around the head or....
If you decide to build a kite in order to send the whistles aloft and make your neighbours angry fix the whistles as follows. Whistles of different sizes are glued together in groups of three one behind the other with the above mentioned "slope" in windward direction. The biggest whistle on the leeward, the smallest on the windward side. There should be a soft slope from whistle to whistle and in no case a windbreaking "step" if you glue the whistles together. On the windward (paper- or silk-) kite surface are mounted little bamboo laths with the hard bamboo side to windward thus acting like an elastic spring. Then the whistle group is set/ pressed on two laths and fixed under tension with threads. These threads are fixed in a certain distance to the flute group in order to press them constantly on the underlaying laths. The groups of little whistles are placed on the kite’s windward surface near the top of the kite, the biggest at the rear end. The kite itself will become comparable heavy dependant on the number of whistles, so that it will be an absolute must to attach a line tail. Choose a windy day to make your kite laugh (what about you?)-- and be careful while launching your kite! The wind develops great power at speeds necessary for the whistles! Observe the general rules for kiteflying and don’t expose anybody (and yourself) to danger!
Always good vibrations to you all
P.S.: Do you know some more Literature/ Links about Kite/ Aeolian Instruments? Please let me know, THANKS!
To Main page Kite Musical Instruments/ Aeolian Instruments
To History of Chinese Kite Flutes/ Kite Whistles
Mail to
Kite
Musical
Instruments
All rights reserved Uli Wahl
